Showing posts with label Crafts. Show all posts

Tuesday, June 18, 2013

Teachers Appreciation Gifts - 2013

Once again it's the end of the school year for the children and by the time this post is up, summer holiday has already started!

Every year we will make small gifts to be given to the teachers to express thanks for their patience and guidance for the past year.

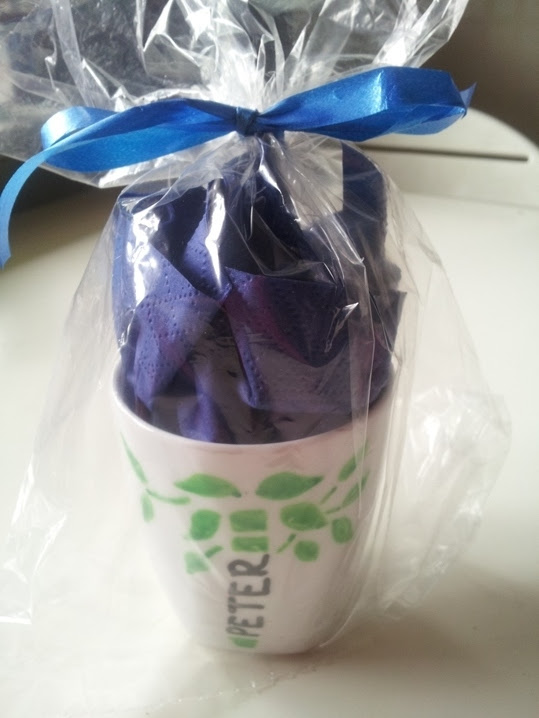
This year, we bought coffee mugs from Ikea and some markers for porcelain and made these!

Peacock feathers for the ladies and bamboo for the men!  I came up with these simple designs which even the kids can duplicate, after all they are the ones who should be making all these for their own teachers.

With their names included as part of the designs and in Chinese as well!

My princess baked thumb print cookies to go with the coffee mugs.

In goes the cookies....

nested in the blue napkin.

Put all of these in a small plastic bag and tied with a simple ribbon! Done!

The thumb print cookies is a recipe taught by one of the teachers during Home Economics class, so it's a nice touch to show the teachers that they remember what they have learnt! :)

Now, what should we make next year??

Wednesday, August 8, 2012

Anniversary Gift

This year is our 7th wedding anniversary and as always I was wrecking my brain regarding what present to get for hubby.  Being a poor thrifty housewife, I can't afford the latest or coolest technical gadgets which hubby is interested in, so I'd have to kill some brain cells to come up with something that is not so expensive and creative.  Being a Pinterest-addict, I've seen many creative ideas and this is what I made!


I cut out the map of Singapore and pin the place where we first met with a glittery heart.  I wanted to print it out on black paper with gold font but I guess my color cartridge in the printer was in holiday mood and wasn't working like it should, so I had to settle for the second best.  It turned out pretty alright anyway!

Saturday, August 7, 2010

Pimping Up Shorts Made From Old Jeans

Found 1 pair of eldest prince old jeans which was torn (as usual) at the knees. The tear were so big, they were beyond repair. So I asked princess if she could fit in them and they fit!

So I cut off the legs up till the torn areas...


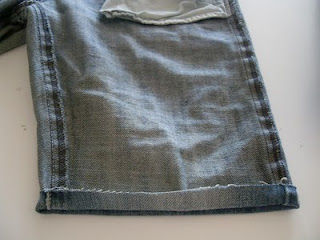
Flip the jeans over to the wrong side and fold up about 1cm at the hem...


Measure the circumference of the hems and cut out 2 pieces of scrap fabric...


Fold about 1 cm on both sides (lengthwise) of the fabric....


Pin on the fabric around the hem...


Fold where the fabric joins...


Sew around the hems...


Flip the jeans over to the right side and fold up the hem...


There you have it, another way to add interest to a pair of old-made-new shorts!

Thursday, August 5, 2010

Snappy Zipper Fix!

I'm sure a lot of us have this same problem once in awhile, you bought a new pair of jeans and realised that the zipper's slide is too loose and the zipper unzip itself when you move. This is a very annoying situation and an embarrassing one to say the least.

I face this problem very often, since I have 2 children whose main dress code consists of mostly jeans. And when they come to me complaining that their zippers are unzipping themselves, I get frustrated just thinking about the hassle of replacing new zippers. I have tried putting a rubber band through the zipper head and then, hooking it over the button of the jeans. I usually have to go over several round before it's tight enough to not slip down again, and if the rubber band is too old and too elastic, that means I basically have to wrap the button up with rubber band... Not only is it unreliable, the kids lose the rubber bands very easily and if I forget to remove them before I throw them into the washing machine....and then I have to find new rubber bands.

So yesterday, when my princess came to me again with a "self-unzipping" zipper, I decided that there must be a solution to this problem without having to change the whole zipper. So I did a small research on the internet and found a comment left on a thread (forgot where I found it) by a guy named "Mike" and God bless him for his brilliant solution! And this is how you solve this "slippery" problem:

First you find a key ring which is not so big but enough to hook it through your button.

Next, hook the ring through the zipper head. And you're done!


Unbelievable! And it works! Pull up the zipper, hook the ring through the button...


and button up your jeans like usual. And you can't even see the ring!


And if you really want to see the ring in action, you'll have to lift up the flap a little and angle yourself.... you see, it's just there doing its job!


I'm so happy with this solution and I yelled at my eldest prince if he has a similar problem and I fixed his jeans within 2 seconds and he was just amazed at how simple it is!

I wish it was me who thought of this smart solution and now I'm sharing it with all the sufferers out there who need a snappy zipper fix!

Thursday, July 29, 2010

Blast From The Past - Five Stones!

Having 4 kids in a small apartment on a raining day can get quite tortuous sometimes. So after I managed to get my youngest prince to take a nap, I came up with a crafting project for the older kids. I decided to introduce them to the game which I enjoyed playing when I was small - Five Stones
We began by cutting scrap fabric to get 5 5cm x 10cm rectangular pieces. And since both Prince J and my princess wanted to have their own, I cut 10 pieces. Then we fold the rectangular piece into half so that it look like a square. I taught them to do simple, small and straight stitches around 2 sides of the square to make a small bag.

It took some time and I thought that they would run out of patience!


but surprisingly, both of them finished stitching all the pieces!


Next we flipped the bags over to show the right side of the fabric.


And I put in the beans...


Fold down about 0.5cm and stitched the opening up (stitch it up so that it becomes a pyramid shape) and voila!


In anticipation of the future fights and arguments on which is whose, I've also made 2 small bags and stitched on the first letter of the names onto the bags for easy identification.


Now the kids have a new game (which needs lots of practice!) which they can bring around easily!

Here is a video to show how it is play.

Wednesday, July 21, 2010

New Character Keychain

I have been working on my orders recently and one of them is a request for a special character keychain. So as always I was sitting on the sofa, "listening" to the tv and crocheting. Hubby, while on his way to fetch something to drink from the kitchen, stopped by to "check-in" on me.

"So what are you working on now?"
"Oh, it's a character from Korea." I replied without looking up.
"Oh... It's a small guy stuffed in a small hat?"
"What?!" I was clueless about what he was talking about until I looked up and saw what he was looking at...


"I have a head and two arms to go with that..." I was slightly amused. "Oh, ok, so it's not done yet huh?" and off he went, continue making his way to the kitchen...

After more intense crocheting, I was finally done! A Pucca keychain!


I like Pucca! ^.^

Friday, July 2, 2010

Take A Break keychains - Singaporean Style!

I have made new variations for the "Take-A-Break" keychain! These are pastries which all Singaporeans are familiar with and it is common to have some of these for breakfast, with a nice hot cup of coffee!

Curry puff with coffee.

Egg tart with coffee.

Looking at these pictures now gives me craving!!!! I'll make the edible version this weekend!

Monday, June 21, 2010

Adopted A Westie!

No, we haven't expand our family by getting a new pet. It’s the new appliqué I did for my youngest prince.


Westies are energetic dogs and they look so cute with their white (almost silvery) fur. We have been talking about getting a dog, however, we have 2 pre-teens, 1 toddler, 1 baby and a slightly unstable mom (well, if you spend most of your days listening to the constant squabbles of 2 pre-teens, fighting with a toddler over everything from changing his diaper to fixing him a glass of milk, and having lengthy conversations with a 6 months old baby, you will be quite unstable too!) at home now and bring in a new puppy will just add more chaos to the current situation.

So I think I’ll just stick to appliqué for now!

Saturday, June 19, 2010

For A Little Princess

Today is the wedding day of the Swedish Crown Princess. And oh, so beautiful she was, walking down the isle with grace and elegance towards her Prince Daniel... The Swedish royal family is well-loved by the people, especially the warm-hearted and sincere Crown Princess Victoria.

We attended a birthday party for a little princess today, who turned 2. I asked her mommy several weeks ago for some "hints" as to what kind of presents we should get and she said that book is always nice to have. So we bought 2 nice storybooks, which my princess wrapped and she also made a "name" card.


The other present standing at the back is a "Miffy-inspired" doll I made for little princess, Tuva.


I've also stitched her name and a small heart to personalize it and as you can see, my stitching needs major improvement...


I hope princess Tuva likes her new friend.

Happy 2nd Birthday, little Miss Sunshine!

Wednesday, June 9, 2010

Summer Bliss

Nothing beats having an ice cream on a hot summer day, it's a moment of pure bliss! However, I always think (and I know it as a fact!) that I should lose some weight. It has been 6 months since I had my baby and I'm still walking around wobbling like jelly in many areas...

But check out these small cornetto ice creams! They contain absolutely NO calories and are definitely figure-friendly! Just watch out for an overdose of cuteness though!

Strawberry Cornetto (keychain) for my princess.


Chocolate with nuts (fridge magnet) for me!!


Now I'm going to dig into the chocolate and vanilla ice cream which hubby has sweetly served up to me!

Have you had your ice cream yet? ^_^

Thursday, June 3, 2010

Old Jeans Made New!

My children wear jeans to school everyday (except princess who wears skirt occasionally), out to play with their friends and even at home (that's just because they're lazy to change into something else), therefore "hole-y" jeans are a common item in our family.

I usually just try my best to patch them up and try to make it look still decent enough to wear. However, after several patches, the area where the holes usually appear (it's always at the knee...) becomes so big that it's just ridiculous to continue patching!

So far I've made a bag and a pair of shorts for my princess from her old jeans. And last week, she came to me with another pair... what should I make this time?

This was what I had...


After cutting...


Patching...


And using the left-over fabric from the legs...


Sew them up, pinned some ruffles and sew onto end of the skirt...


And voilà!


I've also crocheted some flowers and chain-stitched the letter "A" in my attempt to enhance the skirt.


Princess was very happy with the result and that's my reward! ^_^

Friday, May 21, 2010

Take-a-Break Keychains!

My princess was very happy about the penguin and koala bear which I made for her as her birthday presents and she brought them to school to show her friends and teachers. Her teacher asked if I can make a panda for her (Princess's class is divided into panda and bear group, and she is in panda group) and she'll pay me. I told princess that I'll make a panda and a bear for the teacher in-charge of the other group, and the teachers do not need to pay me. They'll be a small token of our appreciation for their patience and kindness in teaching our children.

A few days later, both panda and bear were done. But before I could take a picture of them, princess was so excited to give to her teachers, she brought them to school immediately on the next day... So there's no pictures for me to post here... I'll make more to be put for sale and will post pictures when they're done.

So princess's teachers were both really happy and wrote small notes to thank me and I was glad that they like my crafts. Then my eldest prince - Prince J, wanted me to make something for his teachers too! And he has 4 of them - 2 ladies and 2 gentlemen!
So I suggested to make them the "Take-a-Break" keychains. And here they are:

For the lady teachers: A chocolate cake and a strawberry cake with chocolate ganache!


And for the male teachers: A donut and cinnamon bun and Swedish punchroll.


And they're all served with a nice cup of coffee, hmmmm....

I hope Prince J's teachers will enjoy their keychains!

Baby's Booties

After confirmation that the gifts have arrived, I can finally post this! I was surfing around for a nice pattern for baby's booties to make for my best friend's "soon-to-arrive" baby boy and finally found it at Mamachee! Her Buccaneer booties in different colors were just so cute!

Looking at the pattern, I found out that I need a larger size crochet needle and new yarns to make these cuties. So without any hesitation, I went online and shop! Found the needle I need, bought some new yarns and, oh well, might as well throw in another new needle! *satisfied grin*

Finally my order arrived and I was very eager to start on this project. But I realised that the yarn I bought was too thin for the gauge! Well then, I'll just have to increase the stitch counts myself and try to increase them at the right places too! The first bootie I made was ugly and nothing like those cuties Tara (the creative mind of mamachee) made... I threw that away and gave it another go. The second one turned out slightly better but I didn't like the "line" which formed when I joined the rounds. (I still need to improve on my crocheting skills, there is nothing wrong with Tara's pattern, problem lies with me...) So I put that aside and did a third version but this time, instead of joining the rounds, I continued crocheting, amigurumi-style and I like the result better.


So finally the booties were done and I was looking around for small and pretty wooden buttons to go with them, to give them a zakka-look. After searching around for about 1 week, I gave up. I was planning to use just plain brown buttons on them when I discovered these wonderful "almost vintage" looking buttons lying in the bottom of my sewing supplies.


I bought these buttons when we were back in Singapore on holiday about 2 years ago. At that time, I was confident that I can make my princess a pretty skirt and these buttons would be the perfect embellishment. However, as it turns out, my sewing skill is still limited to just patching up torn jeans and sewing buttons...

The result is not perfect like Tara's (but hey, she's the professional, I'm not!), but I think they still look quite sweet.
.

I've also made 2 mobile phone pouches and a teddy keychain to be sent together with these booties.


I hope D will look behind my less-than-perfect craftsmanship and see the thoughts behind!